 |
|||
|
|
|||
|
|
|||
| ||||||||||
|
|
 TM 55-1730-202-14
c.
Cleaning
and
Inspection.
(1)
Clean
all
parts
with
cleaning
solvent
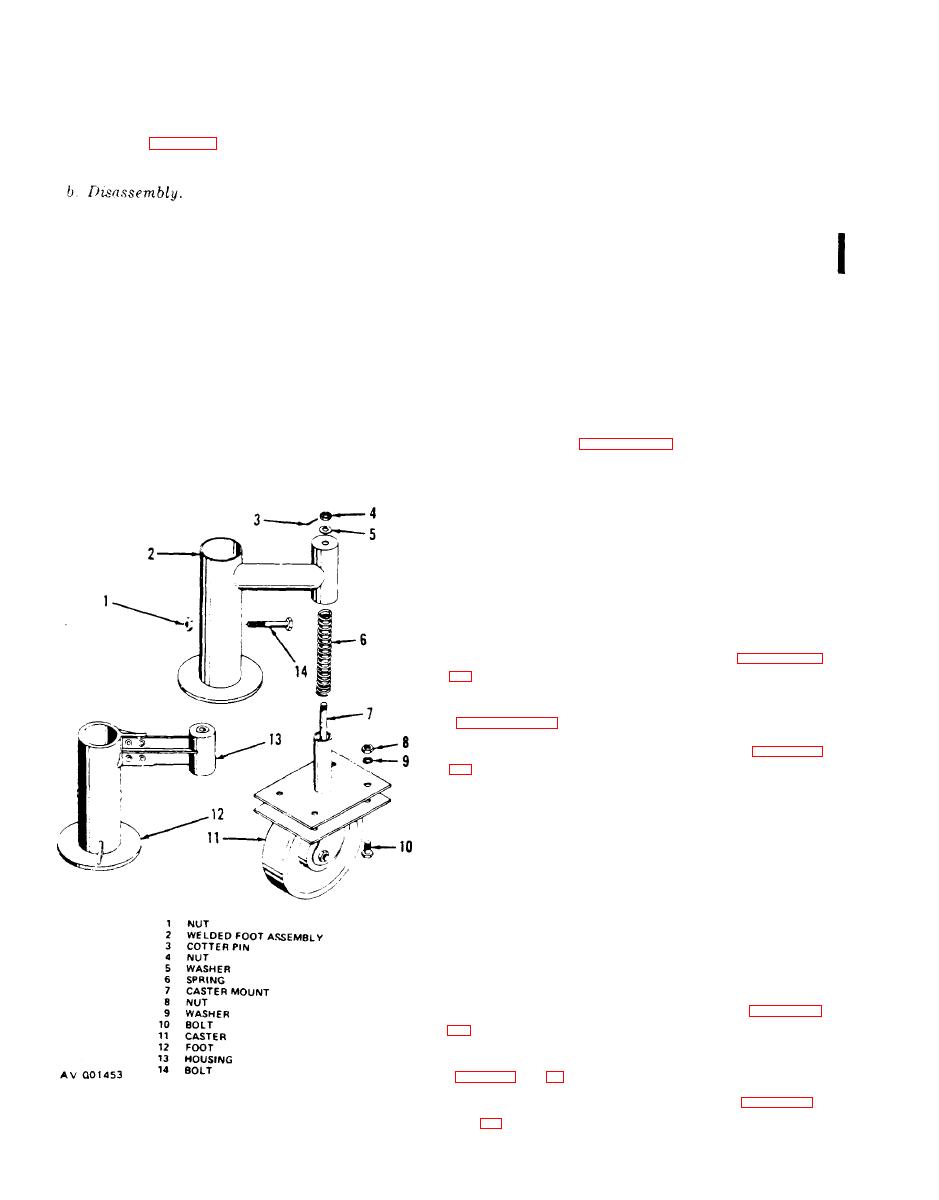
a. Removal. Lay the jack on its side. Remove
(Federal
Specification
P-D-680)
and
dry
thor-
the
nuts
(1,
and
bolts
(14)
and
pull
oughly.
the foot assemblies off the leg extensions.
(2)
Inspect
all
parts
for
damage
and
corro-
sion.
Check
the
casters
to
determine
they
rotate
and
swivel
freely.
Replace
all
defective
parts
(1)
Remove
the
cotter
pin
(3),
nuts
(4),
Retouch or repaint damaged painted surfaces as
and washer (5) that secure the caster mount (7)
required (Federal Specification TT-E-489G, color
13538, Federal Standard 595A).
to the welded foot assembly (2) and remove the
d. Reassembly.
mount with attached caster (11) and spring (6)
(1)
Position
the
housing
(13)
on
the
foot
from the foot assembly.
(12 ) and secure with the four bolts, lockwasher,
(2) Remove the four nuts (8), four washers
a n d nuts.
(9), and four bolts (10) that secure the caster
(2) Secure the caster (11) to
the caster
to the mount and remove the caster.
mount (7) with the four bolts (10),
four wash-
(3) Disassemble the cast foot assembly by
ers
(9),
and
four
nuts
(8).
removing the four nuts, Iockwashers, and bolts
(3)
Lubricate
the
caster
and
stem
of
the
that secure the foot (12) to the housing.
caster
mount
Place
the
spring
(6) and the caster mount with attached caster in
the
welded
foot
assembly
(2)
and
install
the
washer
(5),
nut
(4),
and
cotter
pin
(3).
e.
Installation.
Push
the
foot
assemblies
on
the leg extensions and secure with the bolts (14)
and nuts (1).
43. TRIPOD ASSEMBLY.
a. R e m o v a l .
(1)
Remove t h e pump
assembly
(2) Remove t h e cylinder and ram assembly
(3)
Remove the foot assemblies (paragraph
b. Cleaning and Inspection.
(1) Clean the tripod assembly with clean-
ing solvent (Federal Specification P-D-680) and
dry thoroughly,
(2) Inspect the tripod assembly for cracks,
breaks,
and
distortion.
Replace
a
defective
or
damaged
part.
(3) Retouch or
repaint
damaged
painted
surfaces as required.
c.
Installation.
(1)
Install
the foot
assemblies
(2)
Install
the cylinder
and
ram
assembly
(3)
Install
the
pump
assembly
graph 39) .
Change 3
|
|
Privacy Statement - Press Release - Copyright Information. - Contact Us |
