|
| |
TM 9-5130-338-12&P
4-14. TRIGGER ASSEMBLY REPLACEMENT.
This task covers:
a. Removal
b. Installation
INITIAL SETUP
Tools
Equipment Conditions
Tool kit, general mechanic's (SC 5180-90-CL-N26)
Hydraulic impact wrench disconnected from power
source.
Materials/Parts
Locknut (Appx. F, item 2)
a.
Removal.
NOTE
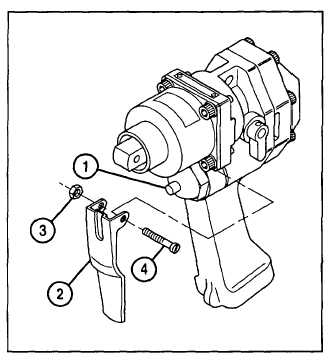
Needle roller (1) may fall out when trigger (2) is removed.
1.
Remove locknut (3) and capscrew (4) securing trigger (2) to hydraulic impact wrench. Discard locknut.
2.
Remove trigger (2).
b.
Installation.
NOTE
Do not overtighten locknut (3).
1.
Install and secure new trigger (2) to hydraulic impact wrench with capscrew (4) and new locknut (3).
CAUTION
Equipment could be damaged if
needle roller (1) does not disengage
when trigger (2) is released.
2.
Check trigger (2) for free play. If trigger
does not operate freely, refer back to
Section IV of this chapter.
3.
Check that needle roller (1) disengages
when trigger (2) is released. If needle
roller does not operate properly, refer
back to Section IV of this chapter.
4-13
|