|
| |
TM 1-4920-448-13&P
2-6. Storage of Hardware.
Care must be taken to ensure that the proper hardware is used to
secure equipment for transport. Lack of correct hardware could cause
extensive damage to equipment or the shelter when shop is moved.
a. All hardware removed from equipment will be collected and placed in cotton mailing bags (see item 3, App
E). Bags are stored in the shop storage chest until shelter is to be moved and equipment bolted to the floor.
b. Position storage chest in mounting bracket.
2-7. Checking Shelter Level.
Once all equipment is in the recommended operational position recheck leveling of
shelter. Use procedures in TM 10-5411-201-14 to verify and adjust level. Correct adjustment is essential to ensure
proper operation of machine tools, doors and access panels. The Hydraulic Shop is now operational.
SECTION III. PREPARING SHOP FOR SHIPMENT OR STORAGE
2-8. Recover and Inspect Equipment Hardware.
a. Remove shop storage chest from mounting brackets.
Care must be taken to ensure that the proper hardware is used to
secure equipment for transport. Lack of correct hardware could cause
extensive damage to equipment or the shelter when shop is moved.
b. Recover cotton mailing bags with hardware from shop storage chest.
c. Inspect hardware for damage or missing parts.
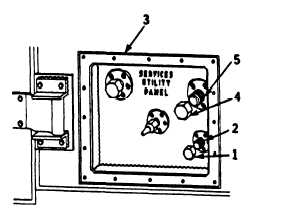
2-9. Disconnecting Shop Utillities (Other Than Electrical).
a. Disconnecting Hydraulic Supply.
1. Install protective dust cap (1) on inlet quick-
disconnect coupling (2) on shop’s services utility panel
(3).
2. Install protective dust cap (4) on return quick-
disconnect coupling (5).
2-19
|