|
| |
TM9-6115-667-13&P
REPLACEMENT
Note: Be sure all machined surfaces are clean, free of
burrs and damage.
1.
Turn the capscrew (22) about halfway into the
Hyrevz motor (31) drive shaft; then slip the rotor
assembly (24) onto the Hyrevz motor drive shaft.
2.
Install the "C" washer (23) onto the capscrew
(22) between the bolt head and the hydraulic motor drive
shaft. Tighten the capscrew with a thinwall 1/ 2-inch end
wrench.
3.
Position the stator (13) so that stickers (11 & 12)
are positioned as shown on page 3 of this manual. Slip
the stator (13) over the rotor assembly (24) and onto the
inboard motor end adapter (26) pilot. Seat into place by
lightly tapping with a soft-faced mallet.
4.
The webs of the outboard bearing bracket
assembly (7) resemble the letter ’Y". Position the
outboard bearing bracket assembly (7) so the vertical
portion of the ’Y’ is at the bottom of the bracket.
5.
Align the outboard bearing bracket assembly (7)
stub shaft with the rotor assembly (24) bearing inner race
bore and the bearing bracket pilot with the stator (13).
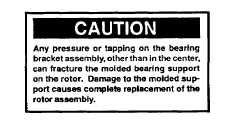
6.
Carefully and lightly tap on the outboard bearing
bracket assembly (7), center only, until the bracket seats
on the stator (13).
7.
Secure the stator between the outboard bearing
bracket assembly (7) and receptacle box (5) and the
inboard engine end adapter (26) using the four 1/4-20 x
9-1/2 inch/32 cm long stator bolts (4) and nuts (29).
Note: The stator bolt holes must line up on both
surfaces.
8. Perform steps 1 and 2 of the RECEPTACLE PANEL
REPLACEMENT procedure to complete the reassembly.
HYREVZ™ MOTOR
REMOVAL, DISASSEMBLY,
INSPECTION, CLEANING,
Obtain Seal Kit, part number 07388, to replace all seals
exposed during disassembly. Note orientation of seals
before removing them. Install new seals in the same
way.
REMOVAL
1.
Perform steps 1 through 7 of the ROTOR
REMOVAL procedures and lay the removed assemblies
aside.
2.
Remove the four 3/8-16 x 2 inch/51 mm long
capscrews (25) securing the inboard engine end adapter
(26) to the motor adapter plate (30).
3.
Lift the Hyrevz motor (31) and attached motor
adapter plate (30) up and away from the inboard engine
end adapter (26).
4.
Place the Hyrevz motor (31) in a vise (with soft
jaws or V-blocks) with the motor adapter (30) up.
5.
Remove the two 5/16-18 x 3/4 inch/19 mm long
capscrews (28) securing the motor adapter plate (30) to
the Hyrevz motor (31).
DISASSEMBLY
1.
Place the Hyrevz motor (31) in the vise so the
soft jaws or V-blocks are around the bearing housing (9)
end with the drive shaft down.
2.
Remove the eight 1/4-20 x 2-1/4 inch/57 mm
long capscrews (5, figure 3) securing the gear housing
assembly (1) and bearing housing (9).
3.
Using a flat-blade screwdriver or similar tool,
gently pry the gear housing assembly (1) away from the
bearing housing (9). Lift the gear housing assembly (1)
straight up.
Do Not tilt the housing or pry on the flat surface inside of
the surrounding groove. For prying, only use the groove
provided at the split between the parts to prevent
scratches on the inner mating’ surfaces.
9
|